

WordPress does not come with two-factor authentication built in. You only get a username and a password. No extra protection stands between a stranger and your dashboard. And this gap matters more. Because bots are scanning the internet around the clock looking for WordPress sites. They know exactly where the login page sits, and they run through thousands of password guesses. This is called a brute force attack, and it happens to small blogs just as often as it happens to big ones.
By setting up two factor authentication, you can close this security gap. Even if someone guesses or steals your password, they still need a second code to get in, one that only you have access to. In this guide, we’ll walk through how to set up two-factor authentication on WordPress using two methods: Email OTP and an authenticator app. Both work well, and we’ll show you exactly how to turn each one on.
What Is Two-Factor Authentication
Two-factor authentication (2FA) means you need two things to log in. The first thing is your password. The second thing is a code that will be sent to your email or generated by an authenticator app on your phone. Only a password is one thing to break through. If someone gets it, they get in. Two-factor authentication adds a second thing they would also need, one that isn’t stored in the same place as your password.
How 2FA Stops a Bot That Has Your Password
For instance, a bot finds your password. Without 2FA, the bot is in. With 2FA on, the login cannot succeed. The site asks for a code too, and only you have that code. So even with the right password, it gets stuck at the second step and can’t go any further. This won’t stop someone who already has your phone in their hand. But that’s rare. What it stops is bots, and bots are the attack most WordPress sites actually deal with. Two-factor authentication doesn’t stop the automated bots from trying. It stops the bots from succeeding, because a correct password on its own is no longer enough to finish the login.
Email OTP vs Authenticator App: What’s the Difference
There are two very common ways to handle the second step of login verification.
Email OTP sends a one-time code to your email address every time you log in. You open your inbox, copy the code, and paste it into the login form. It’s simple and doesn’t require installing anything new, but it depends on your email being fast and secure. If your email account itself gets compromised, this layer weakens.
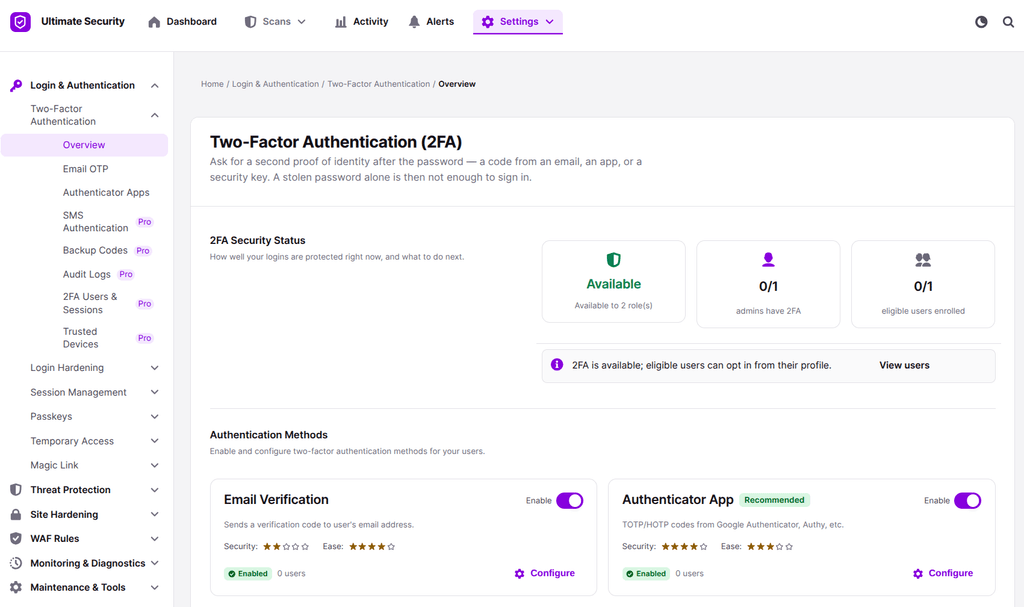
Authenticator App uses a mobile app like Google Authenticator or Microsoft Authenticator to generate a fresh 6-digit code every 30 seconds. It works even without internet. The app generates codes on your device.
In short, email OTP is easier to set up, while an authenticator app gives you tighter security. You can even turn both on for different user roles.
How to Set Up Two Factor Authentication on WordPress Login With Ultimate Security
WordPress doesn’t include 2FA, so you need a plugin to add it. Ultimate Security handles both email OTP and authenticator app methods. It also has role-based controls, so you decide which user roles can use 2FA on your site. Both methods can be managed from one place. Pick the one that fits you below.
How to Set Up Email OTP Method for WordPress 2FA Login
Email OTP sends a one-time code to your inbox each time you log in. It’s the quicker method to set up because you don’t need to install anything on your phone.
Enable Email OTP in the plugin settings
To enable email OTP, you need to configure the following settings from the plugin.
- Open the Ultimate Security settings, then go to two factor authentication under Login & Authentication and find Email OTP
- Turn on the Verification toggle to activate Email OTP.
- Choose which user roles can use it.
- Click Save Changes.
Connect Email OTP to your profile
After you configure the settings from the plugin, you need to finalize the setup from the user profile. Here are the steps to follow:
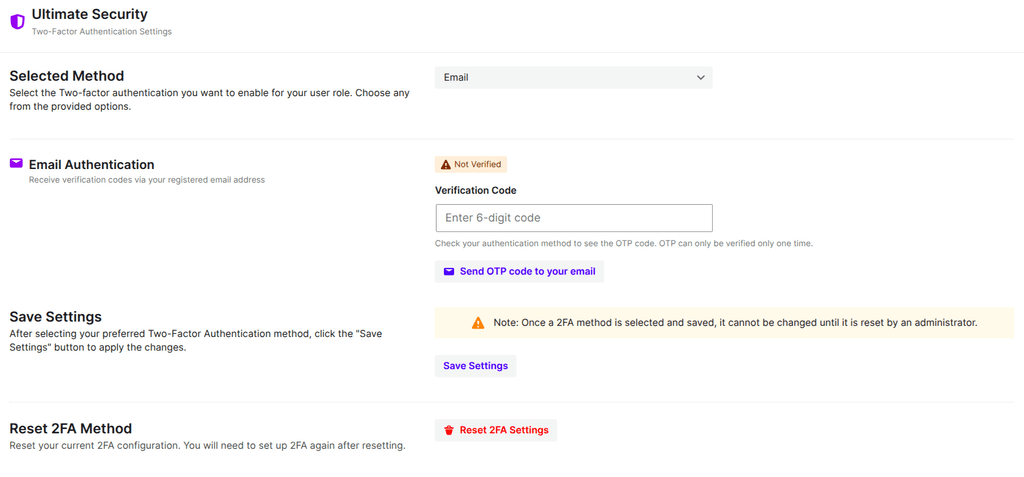
- Go to Users, then Profile, and scroll down to the Ultimate Security section.
- Select Email as your 2FA method.
- Click Send OTP. A code will arrive in your inbox.
- Enter the code in the box provided. Once it’s accepted, you will see a verified mark.
- Click Save Settings, then click Update Profile at the bottom of the page to finish.
Test your Email OTP login
Once you finish configuring, open a new browser window and go to your site’s login page. Type in your credentials and click on login. The other verification should appear, and the email OTP is working correctly.
If the code doesn’t arrive
- Check your spam or junk folder.
- Confirm your SMTP settings are correct and that your site can send email.
- Wait a moment and request a new code.
How to Set Up an Authenticator App Method for WordPress 2FA Login
An authenticator app generates a fresh 6-digit code every 30 seconds. The codes are created on your device, and this method works even without internet.
Enable the Authenticator App in the plugin settings
To enable the authenticator app, you need to configure the following settings from the plugin. Also, you will need an authenticator app installed on your phone.
- Open the Ultimate Security settings, then go to two-factor authentication under Login & Authentication and find Authenticator App
- Click the Authenticator App tab.
- Turn on the Authenticator App toggle.
- Choose which user roles can use it.
- Select your preferred algorithm: TOTP or HOTP
- Select XMLRPC requests
- Click Save Changes.
Advanced Authenticator App Settings
A couple of extra settings live in this section. They are worth a look, since they change how the authenticator app method works on your site. Here’s what each one does.
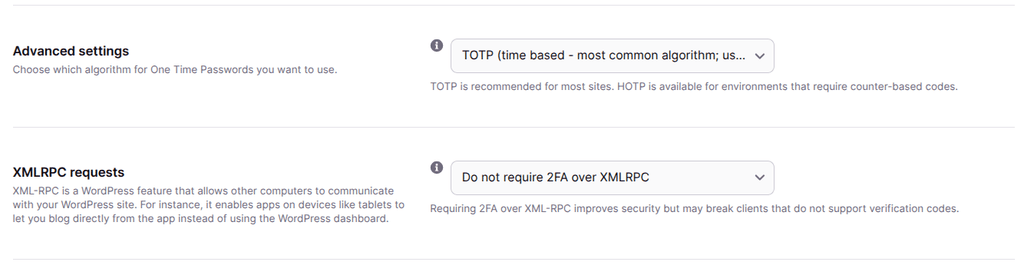
- TOTP: This is the default and what almost every authenticator app expects. The code changes automatically. Stick with this unless you have a specific reason not to.
- HOTP: This generates a new code only when something happens, like a login attempt, instead of on a timer. It’s less common and mainly useful for specific setups.
- XML-RPC protection: XML-RPC is how some outside tools and apps connect to your WordPress site, and it comes with its own security risks if left open. Turning this setting on means those connections need a 2FA code too, not just a password. If you don’t use any tools that connect this way, it’s worth reading about whether to disable XML-RPC altogether.
Link the Authenticator app to your profile
Finally, when you finish the settings from the plugin, you need to finalize the setup from the user profile. Here are the steps you need to configure next:
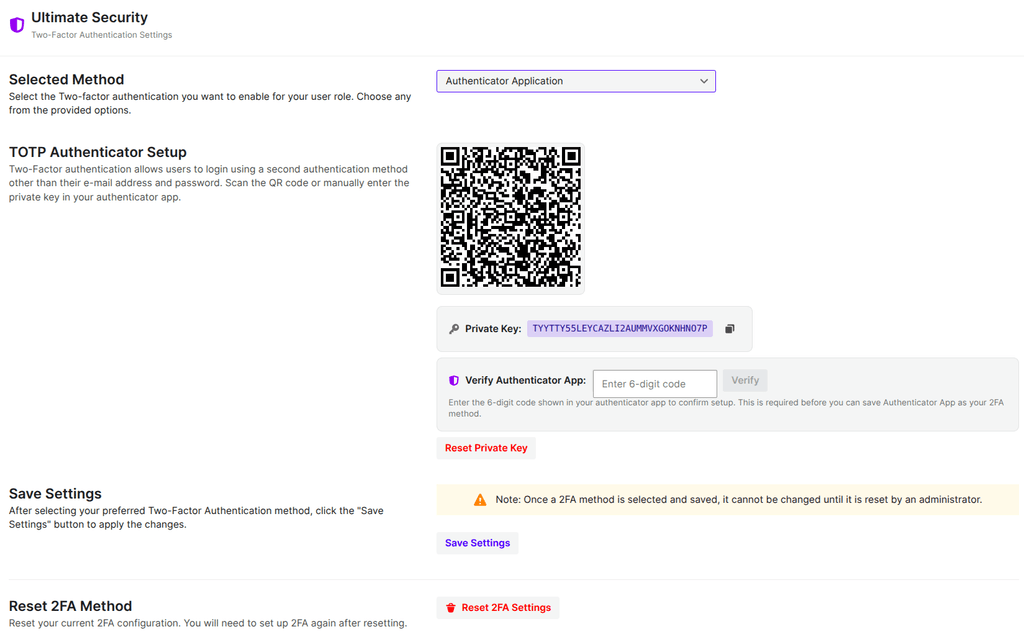
- Go to Users, then Profile, in your WordPress dashboard.
- Scroll down to the Ultimate Security section.
- Select Authenticator Application as your method.
- A QR code will appear on screen.
- Open your authenticator app and scan the QR code.
- Put in the code in the box provided from the authenticator app.
- Click Save Settings, then click Update Profile at the bottom of the page to finish.
If you can’t scan the QR code, then use the manual option instead. Copy the private key shown next to the QR code, open your app, and enter the key in.
Log in with your code
Once the app is connected, setup is complete. From now on, after you enter your username and password, you will be asked for a 6-digit code. Open your authenticator app, find the entry for your site, and type in the current code.
Tip: As with Email OTP, test the login in a different browser before you close your current session so you can fix any problem while you are still logged in.
What to Do If You Lose Access to Your 2FA Method
Losing your phone or getting locked out of your email is one of the biggest worries people have before turning on 2FA. It’s a fair concern. If you lose access to your authenticator app, you can reset your private key from the settings page and reconfigure the app from scratch, as long as you can still log into your account through another admin account. Ultimate Security also gives you an emergency access URL that deactivates the plugin if you lock out yourself by mistake.
Frequently Asked Questions
Does WordPress have two factor authentication built in?
No. WordPress only asks for a username and password by default. You need a plugin to add 2FA, since the feature isn’t part of WordPress core. Ultimate Security lets you enable 2FA for WordPress login.
Is two-factor authentication free to set up on WordPress?
Yes. Email OTP and authenticator app 2FA are both part of Ultimate Security’s free plugin. You don’t need a paid add-on to turn either one on.
Will 2FA slow down my login every time?
It adds one extra step, typically under 15 seconds if your email or app is handy. Most site owners find the small delay worth the added protection.
Can I make 2FA available to some users but not others?
Yes. You choose which user roles are allowed to set up 2FA. Within that role, it’s still up to each person whether they configure it from their profile.
Is two-factor authentication the only way to secure a WordPress login?
No. It’s one part of a bigger picture. Login limits, bot protection, and session management all add their own layer. 2FA is usually a good starting point because it’s simple to set up and covers a common weak spot, the password itself.
Conclusion
WordPress gives you a flexible base to build on. But the security part is up to you, and it starts with deciding what your login actually needs. Two-factor authentication is one of the easiest additions to make and one of the first things worth setting up. Choose Email OTP if you want something simple to start with, or an authenticator app if you’re ready for something stronger. Either one adds a real second step that a password by itself doesn’t have. Set it up on your own account first, confirm it works, then decide which other users on your site should have it too. It’s a small change, and it’s one of the more useful ones you can make today.