Hackers are out there trying to break into your website to steal your data and take control of your site. Logging in to your website is the first thing they will be doing. Until you limit login attempts and safeguard your site, your website will likely be hacked.
WordPress by default allows users to try logging in as many times as they want. This leaves your WordPress site vulnerable to a brute-force attack. Fortunately, you can limit login attempts on the WordPress site. In this article today, we will know how to limit login attempts on the WordPress site.
How to Limit Login Attempts on WordPress Site
Securing your WordPress site by limiting login attempts is a wonderful option. It potentially drives the brute force attackers away and protects your site from them. There are several ways you can restrict login attempts on the WordPress site. You can either limit login attempts with a WordPress plugin or you can do it by writing code in your function.php file. We will show you both ways here. Our process is so detailed that even a WordPress beginner can understand and do the job successfully.
Limit Login Attempts in WordPress With a Plugin
If you search in the WordPress plugin directory, you will find many plugins there. After going through reviews and detailed analysis, we have picked the Limit Login Attempts Reloaded plugin. This plugin is user-friendly and does the job fine.
Now, let’s know the process with the plugin. We will do this in two simple steps.
Step 1: Install and activate the plugin
You can install the plugin by going to Dashboard > Plugins > Add New then search plugin there. Once found click Install then Activate subsequently. Also, you can first download the plugin and then install it by uploading it there. Upload Plugin option is just next to Add Plugins on the screen after you have clicked on Plugins > Add New.
Step 2: Set up the Limit Login Attempts Reloaded plugin
Once the plugin is installed and activated, it is time you set things up. To do that go to Settings > Limit Login Attempts. Here you can define the number of attempts, and lockout time, and place an email address to notify on lockout. Once done click on the Save Options button below.
Alternatively, you can use the SolidSecurity WordPress plugin to limit login attempts and add some other security features to your site.
Limit Login Attempts Per IP Address On WordPress Site
Once you have installed the SolidSecurity plugin on your website. Go to your dashboard > Security > Settings. Click on Features > Firewall, go down to the “Local Brute Force” section, and enable it. Decide how many login attempts you want to allow before an IP is locked out of the system by giving the number in the “MAX LOGIN ATTEMPTS PER IP” box.
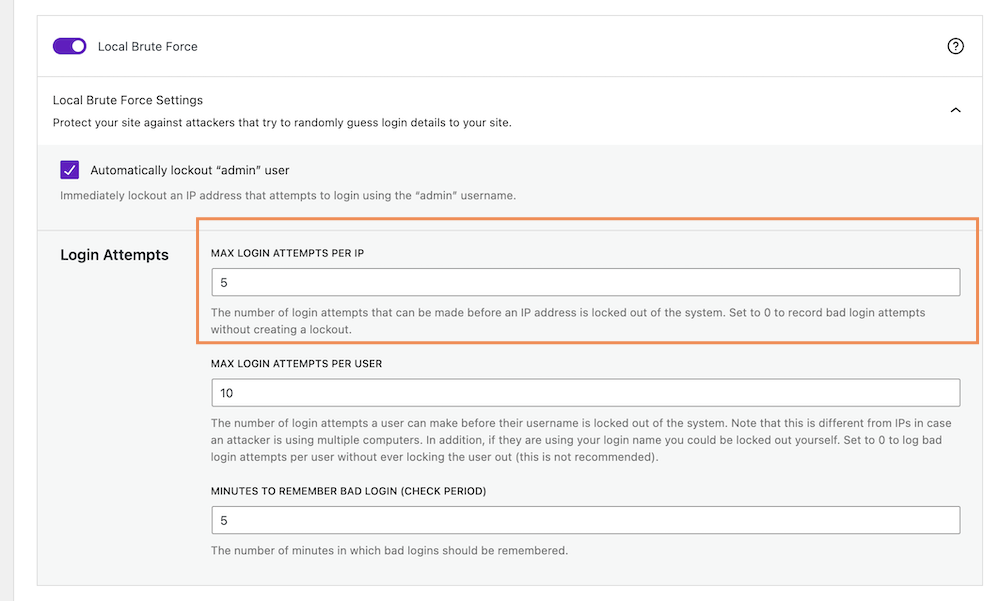
Set to 0 to record bad login attempts without locking out the host.
Limit Login Attempts Per User on WordPress Sites
While the SolidSecurity plugin is installed on your site, go to your dashboard > Security > Settings. Click on Features > Firewall, and scroll down to the “Local Brute Force” section. Now define how many login attempts by a user you want to allow before an IP is locked out of the system by giving the number in the “MAX LOGIN ATTEMPTS PER USER” box.
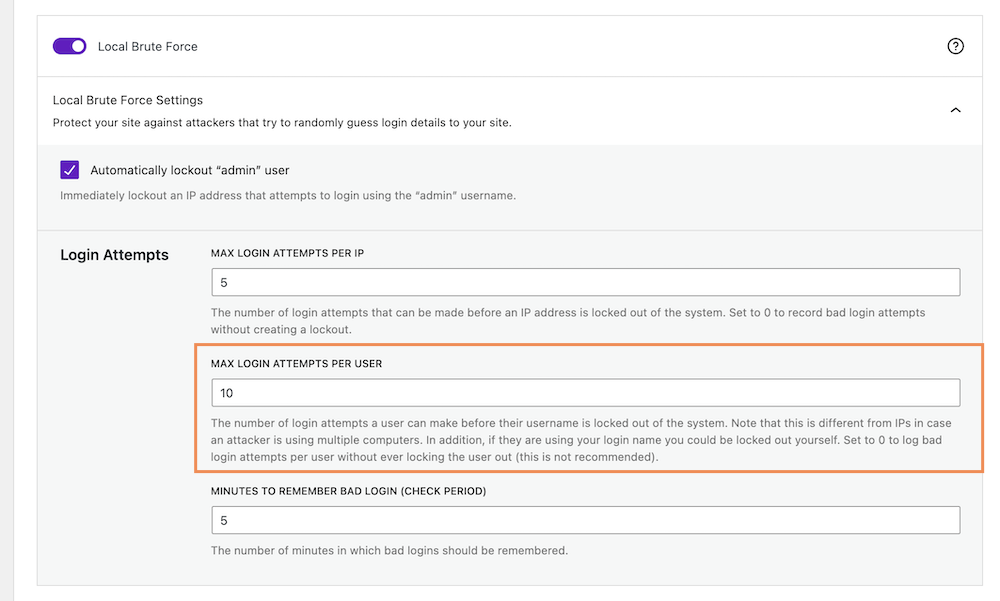
Lock Login Attempts for Incorrect Logins for a Certain Time
You can block hosts that repeatedly try incorrect login credentials to prevent unauthorized access attempts on your website. You can customize the duration for which your website will restrict such users.
While the SolidSecurity plugin is installed, go to your dashboard, then proceed to Security > Settings. Next, click on Features > Firewall and go down to locate the “Local Brute Force” section.
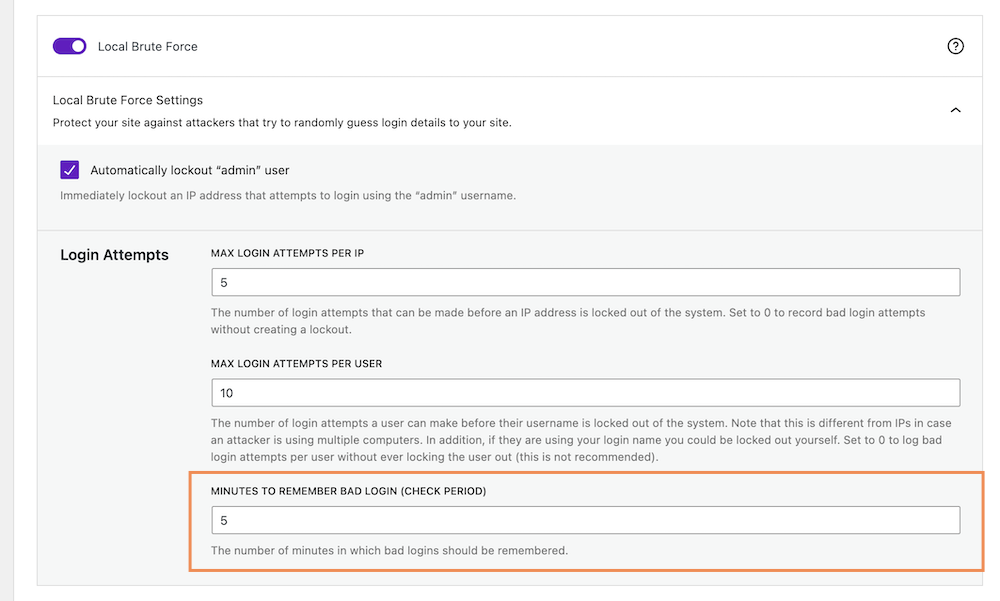
Specify the time frame in minutes during which failed login attempts will be remembered. Adjust the value in the “MINUTES TO REMEMBER BAD LOGIN (CHECK PERIOD)” box to your preferred duration.
Limit Login Attempts in WordPress Without a Plugin
Yes, you can restrict WordPress login attempts in WordPress by adding custom code in the function.php file. Some of you may not want to install a third-party plugin to do the job. For those who want to secure WordPress sites by limiting login attempts without a plugin, we have a piece of custom code for them.
function check_attempted_login( $user, $username, $password ) {
    if ( get_transient( 'attempted_login' ) ) {
        $datas = get_transient( 'attempted_login' );

        if ( $datas['tried'] >= 3 ) {
            $until = get_option( '_transient_timeout_' . 'attempted_login' );
            $time = time_to_go( $until );

            return new WP_Error( 'too_many_tried',  sprintf( __( '<strong>ERROR</strong>: You have reached authentication limit, you will be able to try again in %1$s.' ) , $time ) );
        }
    }

    return $user;
}
add_filter( 'authenticate', 'check_attempted_login', 30, 3 );
function login_failed( $username ) {
    if ( get_transient( 'attempted_login' ) ) {
        $datas = get_transient( 'attempted_login' );
        $datas['tried']++;

        if ( $datas['tried'] <= 3 )
            set_transient( 'attempted_login', $datas , 300 );
    } else {
        $datas = array(
            'tried'     => 1
        );
        set_transient( 'attempted_login', $datas , 300 );
    }
}
add_action( 'wp_login_failed', 'login_failed', 10, 1 );

function time_to_go($timestamp)
{

    // converting the mysql timestamp to php time
    $periods = array(
        "second",
        "minute",
        "hour",
        "day",
        "week",
        "month",
        "year"
    );
    $lengths = array(
        "60",
        "60",
        "24",
        "7",
        "4.35",
        "12"
    );
    $current_timestamp = time();
    $difference = abs($current_timestamp - $timestamp);
    for ($i = 0; $difference >= $lengths[$i] && $i < count($lengths) - 1; $i ++) {
        $difference /= $lengths[$i];
    }
    $difference = round($difference);
    if (isset($difference)) {
        if ($difference != 1)
            $periods[$i] .= "s";
            $output = "$difference $periods[$i]";
            return $output;
    }
}
Code credit: PHPPOT.
Anyone upon tries to log in more than 2 times with the wrong login credential will see an error message and will be blocked for a specific period.
Note: Set Strong Passwords to Secure Your Website More
Your website password is your first defense against any malicious attack. We recommend that you set strong passwords for your WordPress login. Strong passwords are difficult to guess. It is better if you generate passwords with the WordPress default system. WordPress recommends strong passwords with different combinations. To do that, log in to your WordPress site, go to your Profile > Account Management > New Password, and click on Generate Password.
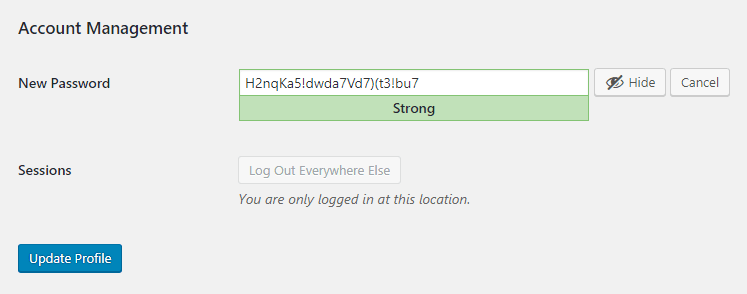
Save the generated passwords for future use. You won’t be able to remember these passwords due to their complex combination. Better you save the passwords somewhere safe for future use. You can also decide to log out from all other devices you previously logged in by clicking on the Log Out Everywhere Else button. Finally, save changes by clicking on the Update Profile button at the bottom.
Follow any of the two above ways to limit WordPress login attempts in WordPress and secure your WordPress site. Protect your site from brute force attackers by adding an extra layer of security to your login system. For more such WordPress, tutorials visit Virfice regularly. Good luck.



Hello, great articles,
i’ve put that code above and combine it with google recaptcha to protect my login page
but i need to know how to lengthen the blocking time to 12 hours instead 12 minutes
Hello Morgan. Thanks for your comment. I wish I could help you with that. Unfortunately, I am not that good programmer. Also, I am so sorry about this late reply. I hope you have fixed your issues by this time.
I need this code customized for woo commerce.. currently, it’s working but doesn’t display any message for remaining attempts.
Hello Mehmood. Thanks for your comment. I wish I could help you with that. Unfortunately, I am not that good programmer. I am sorry.
I like the approach where you remember the devices that users log in with, so that you dont block people that have simply forgotten their password. You can also notify them when someone logs in from a new device. There’s a plugin (of course!) https://wordpress.org/plugins/guardgiant/
Is it possible to stop displaying the box to enter name and password when the waiting text is displayed? Thank you!